Contents
- 1 Overview
- 2 Build a structure of Man9GlcNAc2 using three methods
- 2.1 Build it using the Carbohydrate Builder
- 2.2 Build it using the Oligosaccharide Library
- 2.3 Build it using the Text Entry Dialog
- 3 Building Glycosaminoglycans (GAGs)
- 4 Files contained in a download
- 5 If there is extra time
Overview
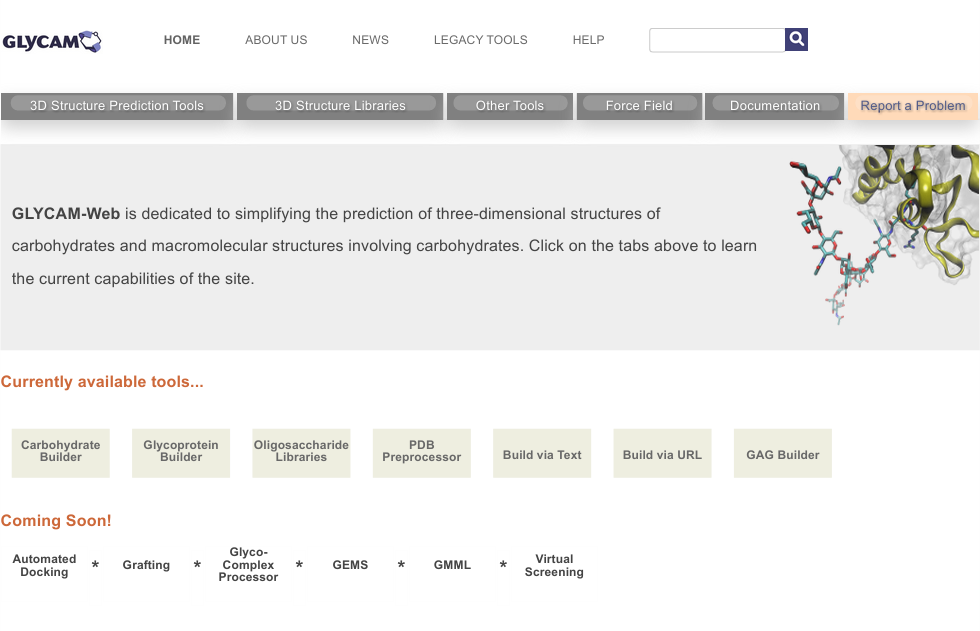
GLYCAM-Web provides tools to facilitate molecular modeling of oligosaccharides and larger molecular structures containing glycans. Type ‘glycam.org’ (or ‘http://glycam.org’) to go there. You should see a page looking like the one just below.
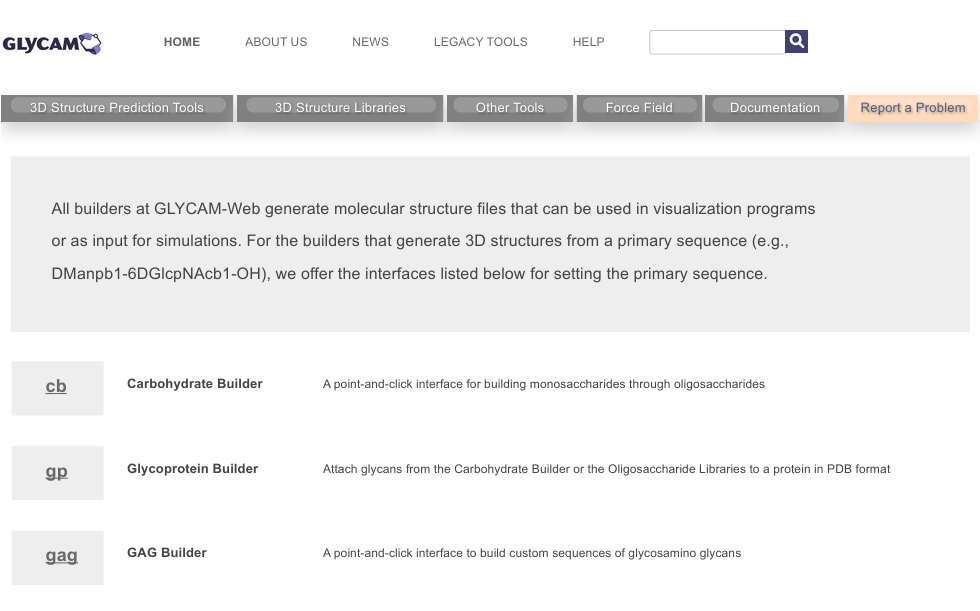
Once there, click on 3D Structure Prediction Tools, the gray tab on the left near the top. You should now be on a page similar to that shown below. During this course, we will use a few of the tools listed on this page, including the Carbohydrate Builder (cb) and the Glycoprotein Builder (gp). You might notice the abbreviations in parentheses in the previous sentence. Those indicate short URLs for accessing the tools. For example, to go to the Carbohydrate Builder, the short URL is glycam.org/cb. Similarly, for the Glycoprotein Builder, it is glycam.org/gp.
Build a structure of Man9GlcNAc2 using three methods
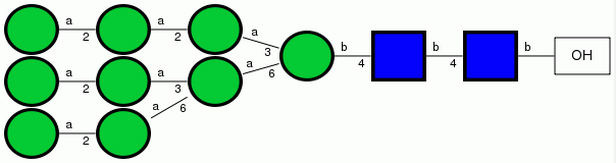
Here are two representations for Man9GlcNAc2: symbolic, and condensed.
| Condensed |
| DManpa1-2DManpa1-6[DManpa1-2DManpa1-3]DManpa1-6[DManpa1-2DManpa1-2DManpa1-3]DManpb1-4DGlcpNAcb1-4DGlcpNAcb1-OH |
First, convince yourself that these two representations are the same. Note that mannose residues are green circles in the left and Man at right. Similarly, GlcNAc is represented by blue squares. Note the meaning of the square brackets.
Build it using the Carbohydrate Builder
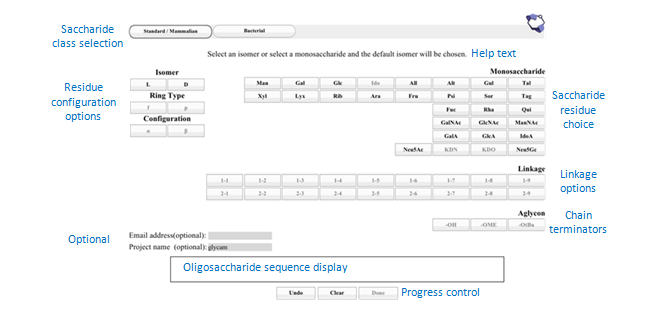
We are showing this interface first because it is user-friendly and flexible. Later, we will show you two shorter methods for building the structure. To begin, either click on the cb link on the current page at GLYCAM-Web or enter glycam.org/cb into your browser’s location bar. The result should look like the image below. Note that in the image, sections of the page have been labeled with descriptive blue text.
Following the symbolic representation, we will first build the bottom chain, proceeding from mannose at the non-reducing end (left) to the OH at the reducing end (right). Then, we will add the disaccharide branch just above that chain. Finally, we will add the trisaccharide branch at the top. When you have finished your build, the text in the oligosaccharide sequence display box should match the condensed notation.
Perform the clicks as instructed below. Note, however, that you can omit the ‘D’ clicks because these monosaccharides are all D, which is the default value for them (a few monosaccharides default to L).
Part 1: Build the sequence for the oligosaccharide (Step 1)
Section 1: Build the main chain
For convenience, the sequence is given here again, and the portion being built is in boldface.
DManpa1-2DManpa1-6[DManpa1-2DManpa1-3]DManpa1-6[DManpa1-2DManpa1-2DManpa1-3]DManpb1-4DGlcpNAcb1-4DGlcpNAcb1-OH
Perform these clicks, in order, left to right and top to bottom:
D Man α 1-2 D Man α 1-6 D Man α 1-6
D Man β 1-4 D GlcNAc β 1-4 D GlcNAc β OH
When you are finished, the oligosaccharide entry box, and the progress control buttons (below) should look like this: 
Note! Do not click Done yet (that will happen later).
Section 2: Add the disaccharide branch
DManpa1-2DManpa1-6[DManpa1-2DManpa1-3]DManpa1-6[DManpa1-2DManpa1-2DManpa1-3]DManpb1-4DGlcpNAcb1-4DGlcpNAcb1-OH
Click on Add Branch in the progress control section of the dialog. You should now see something very similar to the image below. Note that the sequence is displayed above the text box, and the saccharide residues have been enclosed in boxes. Click on the third DManpa from the left.

The dialog should now look like:

Note the square brackets that have appeared before the residue you clicked.
Perform these clicks:
D Man α 1-2 D Man α 1-3
You will notice that the branch text is building inside the square brackets as you click. When you have finished click Finish Branch, which should be enabled once you click the 1-3 button. The dialog should look like:

Section 3: Add the final trisaccharide branch
DManpa1-2DManpa1-6[DManpa1-2DManpa1-3]DManpa1-6[DManpa1-2DManpa1-2DManpa1-3]DManpb1-4DGlcpNAcb1-4DGlcpNAcb1-OH
Again, click on Add Branch in the progress control section of the dialog. This time, click the DManpb that is the first from the right. Alternately, it is the sixth Man from the left. It might be worthwhile counting from both directions to double-check your clicks so far.
Perform these clicks:
D Man α 1-2 D Man α 1-2 D Man α 1-3
…then click Finish Branch again. At this point, the text in your oligosaccharide sequence display box should exactly match the condensed representation given above. The dialog should look like:

Once you are satisfied with the sequence, click Done.
Part 2: Set build options and wait for the server (Steps 2 and 3)
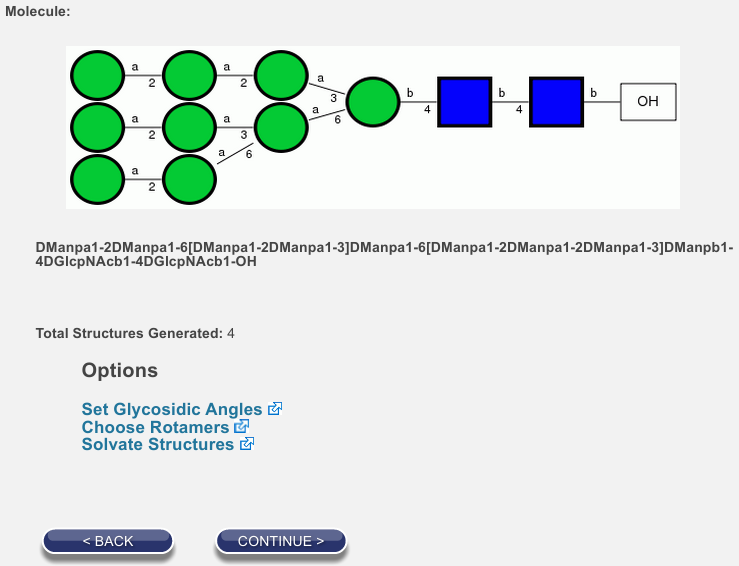
You should be forwarded to a page that contains graphics similar to those below left. Note that the symbolic and condensed notations for your glycan are confirmed for you on this page. Below the representations, you will see that 4 structures have been generated. This is because the two 1-6 linkages can each populate two rotamers with significant frequency at biological temperatures.
Click on Choose Rotamers.
You should now see the information shown below:
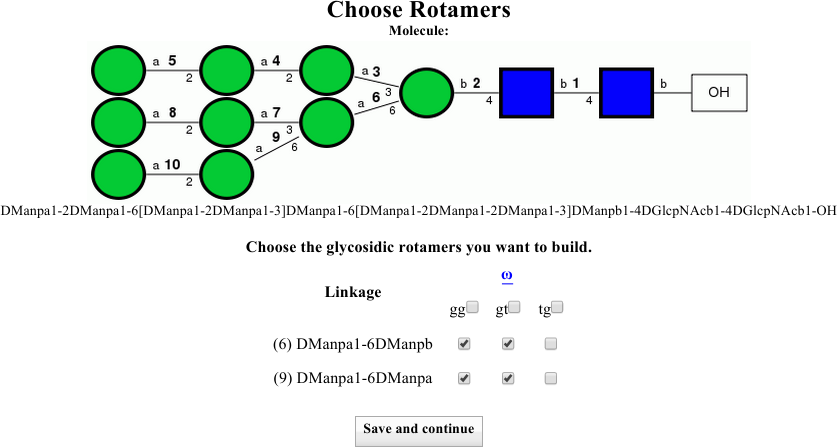
Note that there is a change to the symbolic representation. Here, numbers have been added above each linkage. Compare the symbolic representation to the table below and confirm for yourself that the two 1-6 linkages, numbered 6 and 9, have been set to be built in the gg and gt rotamers, for a total of four configuration combinations.
Instruct the dialog to also build the tg rotamers either by clicking the two boxes at the right of the linkage information rows, or by clicking the box next to tg to select them both at once (see image below).

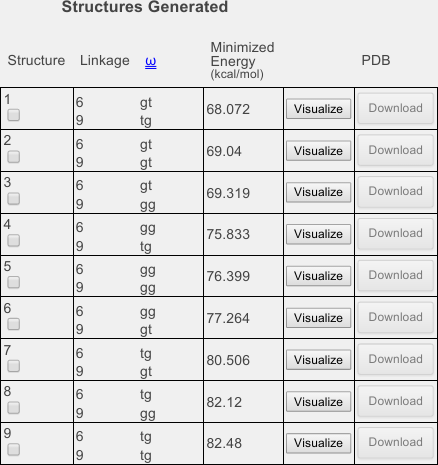
Click Save and continue and when you have returned to the options page, confirm that 9 structures will now be generated, as shown below:
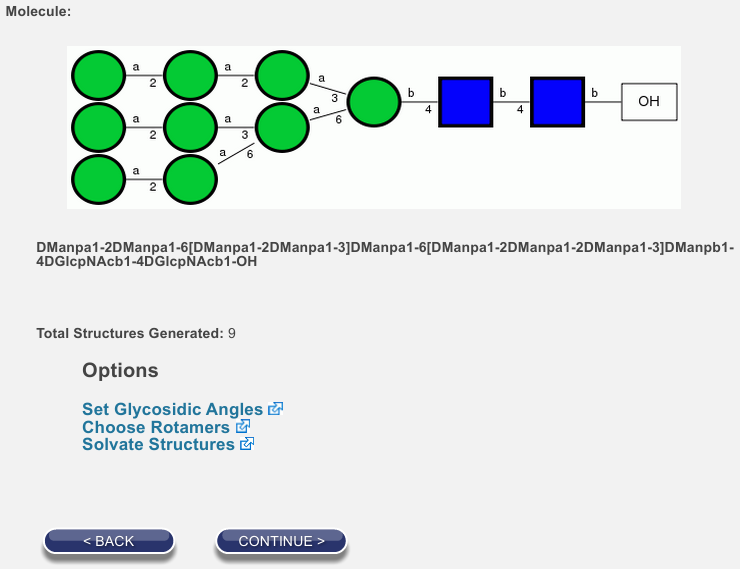
If there is time, we will discuss the other available options. For now, click Continue. You will probably have to wait a few seconds, but the process should not take more than a minute unless there is heavy network traffic or a similar problem.
Part 3: View and/or download files (Step 4)
You should be forwarded to a page that contains a lot of information. Let’s consider it in parts.
At the top (see below), you will find information about the build process. It includes another confirmation of the structure, some information about the force field used to predict the structure, some text explaining how these are only a few of the possible conformations the molecule can adopt, and a confirmation that, as requested, nine structures were generated.
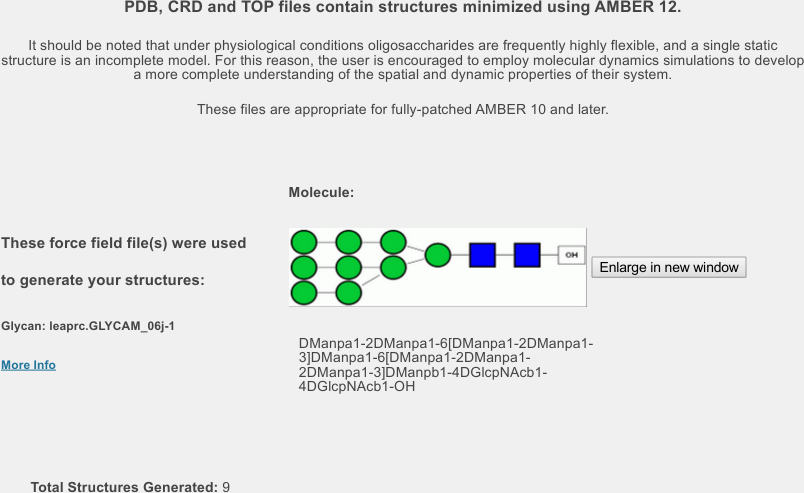
Below that is information about the files you can download.

Downloading all the files
On computers running Windows choose zip and click Download All Structures. We will return to this later.
Selecting files for download and interpreting structure numbers
If you scroll down from there, you will find a table (below). Each row of the table corresponds to one of the nine structures you built. They have been sorted from lowest to highest minimized energy. In the leftmost column, you will find check boxes. You can use these check boxes to selectively download certain structures using the Download Selected Structures button above. For example, if some of the structures had higher minimized energies (third column), you might choose not to download them.
However, unless there is a serious energy problem, the minimized energy is not a sufficient test to use if you want to determine how likely a structure will be. For evidence of this, note that some of the tg structures (see info in the second column) occur at lower minimized energies. We know from NMR experiments that these rotamers are very rarely populated in solution.
It is also possible to download only the PDB file for each structure. Currently, individual PDB files must be downloaded one at a time.
Visualizing structures online
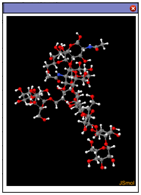
If what you most need is a quick look at a structure, you can choose to visualize it online. As with the individual PDB file downloads, you can only visualize one at a time. Choose one of the structures and click on Visualize. Note that clicking the checkbox in the leftmost column is not required. You should be rewarded, after a short time, with an image of a molecule. If you click in the box, you can rotate the molecule by holding down the left mouse button and moving it about in the box. See if you can find the reducing end of the molecule (hint: look for the blue nitrogen atoms in the GlcNAc residues).
Build it using the Oligosaccharide Library
GLYCAM-Web contains a library for some structures of common interest. To view a list of all the libraries, enter glycam.org/oslib into your browser’s location bar. From there, click on the link for the High Mannose library. Alternately, type glycam.org/hmlib into the location bar. You should see a page like the one below. 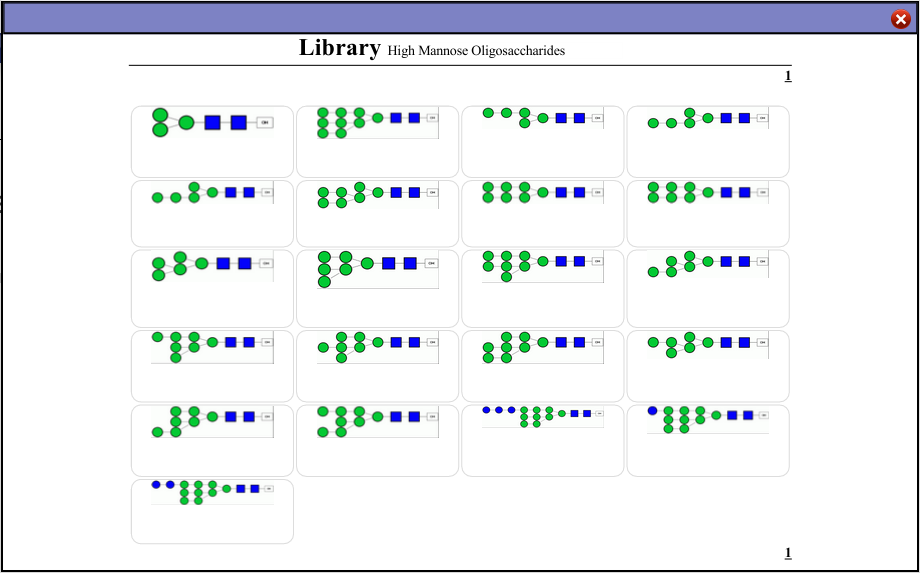
The structure you built in the last exercise is on the top row, second from the left. Hover your mouse over it and click on the Enlarge button that appears when your mouse is over that entry. Confirm that you have chosen the same structure you just built using the Carbohydrate Builder. Click Select. You will now find yourself at the same options page you arrived at in Part 2: Set build options and wait for the server (Steps 2 and 3), above. That was a lot faster, wasn’t it?
This method is great for structures in our library. However, there is one other method you might find useful. Before leaving this page, you will find it convenient to copy the condensed nomenclature for your structure (see figure below).

Build it using the Text Entry Dialog
If you need to build a structure too large or complex for the Carbohydrate Builder, but which does not exist in the Oligosaccharide Library, you have another option. You can enter the text for the oligosaccharide directly into a box on the server. You must use GLYCAM-Web’s condensed notation, and the dialog can be very picky about your typing, but in many circumstances people prefer it. To get there, go to glycam.org/txt – the page looks like the image below.
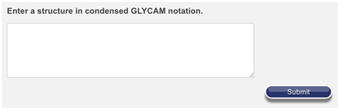
For your convenience, the sequence is copied below. Copy it into the dialog box, ensuring that there are no spaces or carriage returns before or after it.
DManpa1-2DManpa1-6[DManpa1-2DManpa1-3]DManpa1-6[DManpa1-2DManpa1-2DManpa1-3]DManpb1-4DGlcpNAcb1-4DGlcpNAcb1-OH
It should look something like the image below.
Building Glycosaminoglycans (GAGs)
Glycosaminoglycans (GAGs) are linear carbohydrate polymers in which consecutive residues alternate between two sets of monosaccharide units; for this discussion, call them sets A and B. That is, in the simplest description, the polymer is built in patterns of …ABABAB…, and so forth. In biological systems, they usually build in disaccharide units, AB. But, a sequence of scientific interest might begin or end with a member of either set A or set B. Saccharides in set A are hexosamines. Those in set B are hexoses or hexuronic acids. Saccharides in either set might be sulfated. Different types of GAGs are characterized by the makeup of sets A and B.
Set A

Set B
At GLYCAM-Web, a special interface, called the GAG Builder (glycam.org/gag), simplifies the process of building up custom GAG sequences. A view of part of the landing page is shown above left.
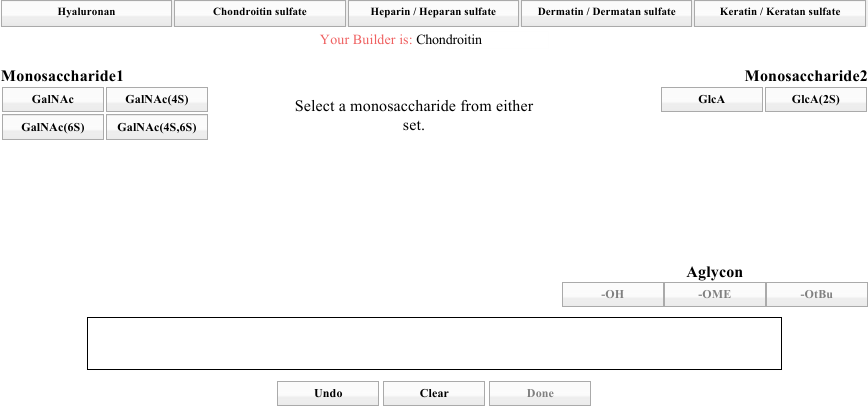
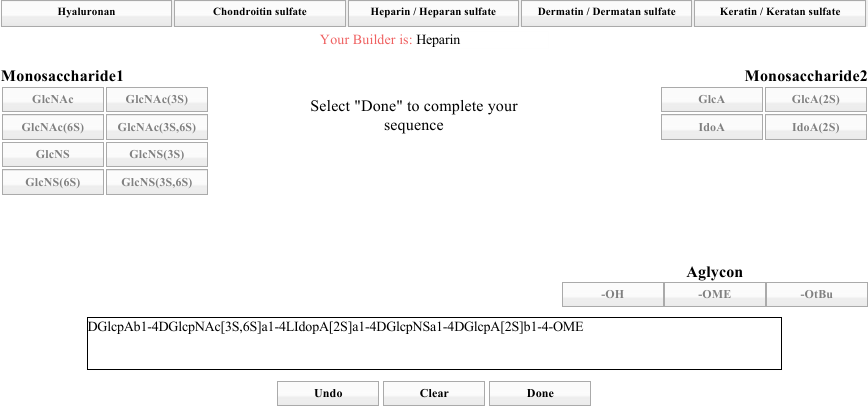
Note the top row of tabs. Those represent the various classes of GAG that the builder supports. Spend a moment seeing how the sets for A and B are different for each GAG class. When you are done, click on the Heparin / Heparan Sulfate tab. The result should look like the image below.
To accommodate many types of GAG fragments, it is possible to begin building from either part of the AB pair, as the instruction in the center indicates. Choose one from either side. For this discussion, we will start with GlcA (right side, top left).
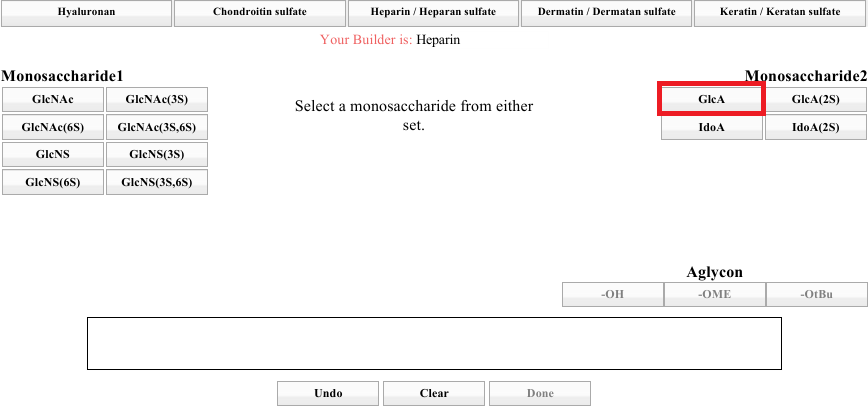
Note that the entire block on the right has become inactive, and the instruction directs you to choose from the left-hand side (below).
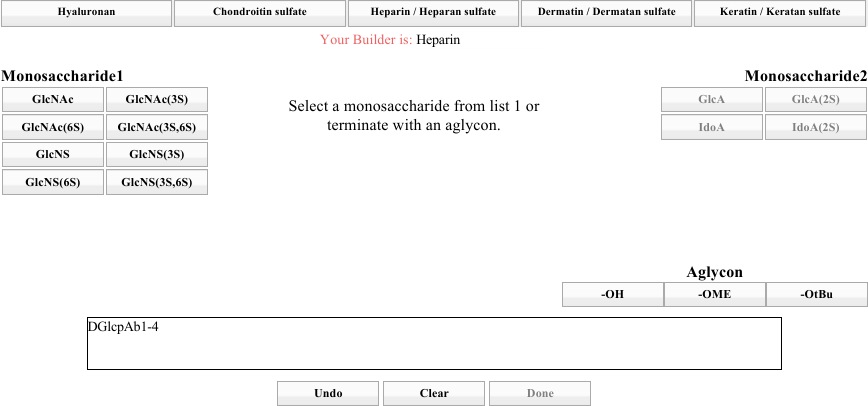
Build yourself a heparin GAG, choosing whatever residues you like from either side, until you have a GAG that is four to six residues long. When you are finished, choose an Aglycon. At that point, the Done button should activate. An example build is shown above below.
After you click Done, the rest of the process is just like all the others. In the image of the options page below, you will notice dashed lines around the third saccharide. The dashed lines indicate that it is an L sugar. We use these dashes in our representations because the site can build many sequences, biologically observed or not, and we find it reassuring to have a visual cue indicating that the proper isomeric form of the saccharide was used.
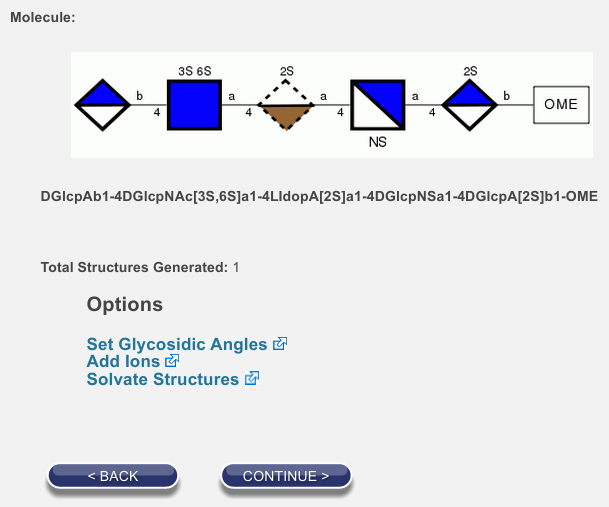
You might notice that the GAG builder is just a user-friendly way to build a sequence for a GAG. This is true. If you want, you can copy the sequence from the options page, enter it into the text-entry dialog, and end up at exactly the same place. That is, the following will also lead you to the page shown above.
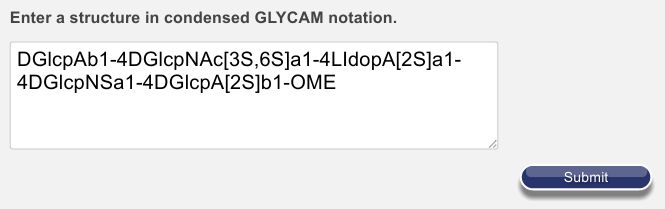
For your convenience, here is the text in a form that is easy to copy:
DGlcpAb1-4DGlcpNAc[3S,6S]a1-4LIdopA[2S]a1-4DGlcpNSa1-4DGlcpA[2S]b1-OME
Feel free to play around with the site on your own. 
Files contained in a download
When you download a set of files from GLYCAM-Web, we assume that you might want to do a molecular dynamics, or similar, simulation. For that reason, we include quite a few files in the downloaded archive.
Find the archive you downloaded earlier and extract the files. The resulting directory should be called glycamstructures.
Use a file browser to inspect the contents. Please use the “Details” display method and sort by name. Starting from the top, you will find nine sets, one for each of the rotamers you made. The image in your file browser should look similar to the one below.
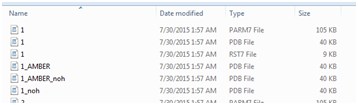
These six files contain four variations on a PDB file plus two files necessary for performing an AMBER-style molecular dynamics simulation. The table below references the ‘1’ set, but the information applies to 2-9 as well. The files are:
| 1.pdb | A regular PDB-formatted file |
| 1_noh.pdb | The same, but with hydrogens omitted |
| 1_AMBER.pdb | A PDB-style file, but with formatting changes to make it easier to use with AMBER |
| 1_AMBER_noh.pdb | The same, but with hydrogens omitted |
| 1.parm7 | An AMBER-formatted parameter topology file, required for an AMBER MD simulation |
| 1.rst7 | An AMBER-formatted input-coordinate file, required for an AMBER MD simulation |
You will also find these four files, near the bottom of the list:
| ForeFieldInfo | Information regarding the force field parameters that were used to build your structure |
| graphviz_script | The script that was sent to graphviz in order to generate the symbolic representation of the glycan |
| rotamer_Mapping_info | The contents of the rotamer table from the download page, but in text form |
| sander.min | The control parameters that were used when each structure was minimzed |
Open rotamer_Mapping_info in your text editor. You will see something like the following (this is Notepad++):
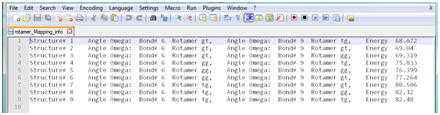
From this file, you can determine which structure was which conformation long after you leave the site.
If there is extra time
Try building other structures. For example, use the Carbohydrate Builder to generate a sulfated, acetylated or methylated oligosaccharide. Or, explore the libraries, try other GAGs, etc. You can also explore the documentation (glycam.org/docs) or check out the bug-reporting mechanism (glycam.org/bugz).
