These instructions are for the version of the Carbohydrate uilder which builds from left to right.
- Specify the glycan sequence.
- Set any non-default options you like.
- Visualize the structure online (optional)
- Download structure files (optional)
The example sequence for this scenario is:
DNeu5Aca2-3DGalpb1-3[DNeu5Aca2-6]DGalpNAca1-OH
Step 1: Specifying the glycan sequence
Here, we will use the Carbohydrate Builder‘s point-and-click interface to set the chemical sequence for the oligosaccharide. (Link will open in a new window). Afterwards, check out the Alternate Protocols section, below, for other ways to set the sequence.
Step 1.1: Set the Main Chain
Build up a linear sequence starting from any monosaccharide at a non-reducing end and going all the way to the reducing end. We will call this the main chain.
The main chain we will use for our example comprises the bold-faced, black portions in the sequence:
DNeup5Aca2-3DGalpb1-3[DNeup5Aca2-6]DGalpNAca1-OH
Note that all except the portion in brackets is part of the main chain.
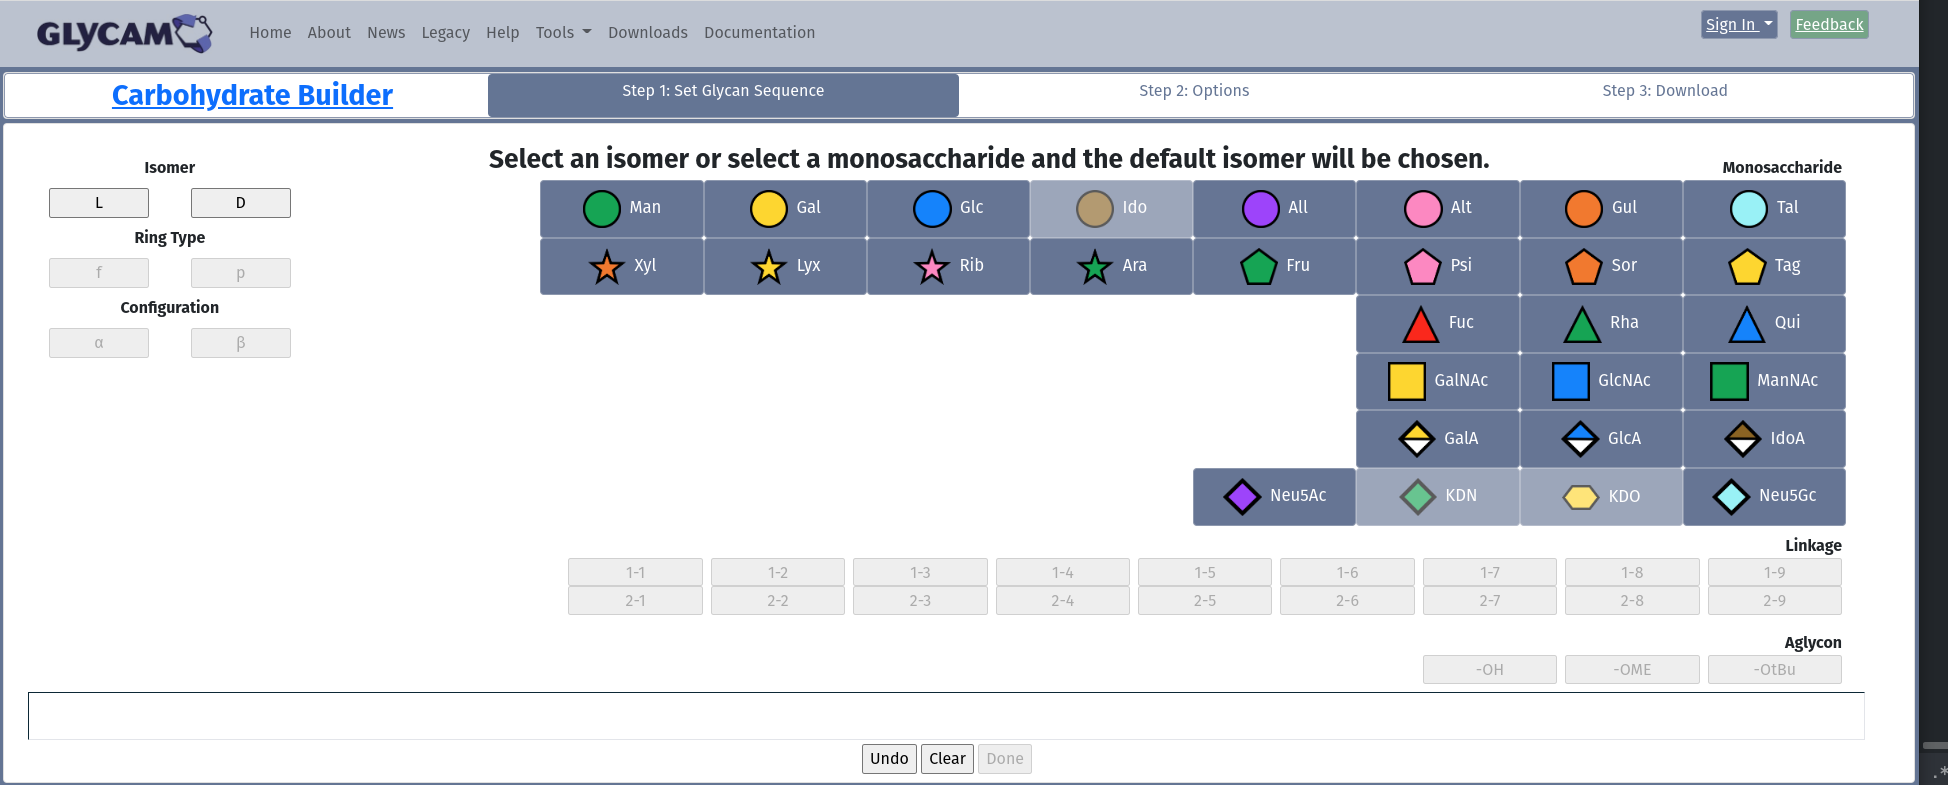
When you first open the Carbohydrate Builder, this is what you will see:
Carbohydrate Builder Landing Page

When you first arrive at the Carbohydrate Builder, this is what you will see. Note the portions of the page that are active: Isomer, and Monosaccharide. If you want to ensure the isomer (D or L) for your monosaccharide, then choose it in the Isomer box, Otherwise, just choose a monosaccharide, and the builder will choose the most common isomer for you.
Now, click on Neu5Ac. At this point, the dialog will change and the Configuration buttons will become active. Note that you could also have clicked D before clicking Neu5Ac.
Select α.
The Linkage buttons will only become enabled for positions that make sense for the current context.
The Linkage buttons for ketoses

If you have just selected a ketose as your monosaccharide, the Linkage box will look like this. Note that it already knows that your linkage will be 2-x.
Choose 2-3 as the linkage. At this point, the Isomer and Monosaccharide boxes become active again. Finish building the main chain. After you have built the sequence as far as the reducing-end GalpNAc, note that the Aglycon box is active and choose to terminate with an -OH.
Aglyon buttons

This box shows the available reducing-end terminations. Clicking one of these signals the termination of the main chain in the glycan sequence.
At this point, you have finished the main chain. Now you will add the other Neup5Ac as a branch off of the GalpNAc. Your Sequence box should look very similar to the one below.
The Sequence box with a completed main chain

Once you have terminated your main chain with an aglycon, the Sequence box gives you a number of options. If your glycan is complete, merely click Done. Alternately, you can Add a Branch or Add a Derivative.
If you want to learn about adding derivatives (such as sulfate or methyl groups), see Alternate Protocols.
Step 1.2: Adding a Branch
Click on Add Branch. Notice the change in the Sequence box:
Choosing the location of a new branch

After you have clicked Add Branch, the CB will need to know where it will go. Note the Branch Options portion of the dialog. The monosaccharides that are able to receive a new branch are highlighted. Choose the monosaccharide where your branch will terminate.
Click on the GalpNAc. Now, in the sequence, just in front of the GalpNAc, you will see a new set of square brackets:
A Branch Begins With Square Brackets

When you have chosen a location for your branch, the dialog places a set of square brackets where the new branch will go. As you build the branch, its sequence will show inside these brackets.
Here is a reminder of the sequence. Shown in bold are the parts not yet added:
DNeup5Aca2-3DGalpb1-3[DNeup5Aca2-6]DGalpNAca1-OH
Build the DNeup5Aca2-6 portion. When you have chosen the ‘2-6’, the Finish Branch option will become active:
Finishing a Branch

If the Finish Branch button is not available, it is likely that you are trying to connect the branch at an already occupied location. Try a different linkage option.
Click on Finish Branch and then on Done.
Step 2: Setting options
After clicking Done, you will proceed to the Options page. Note that the molecule shown is not minimized yet. You aren’t required to set any additional options, but they are available. This Scenario assumes that you do not make changes. To learn more about the available options, see Additional Information – Descriptions of Available Options, below.
The OMS Options Page

This image shows all possible options. At the top, the sequence for your molecule is shown. If you are happy with that and wish to accept the website defaults, you may simply click Generate Selected Structures. You may also need to deselect structures if more than 64 structures would be built. The page will not allow progress if zero, or more than 64 structures would be built with the current selection. Here, only 12 would be generated.
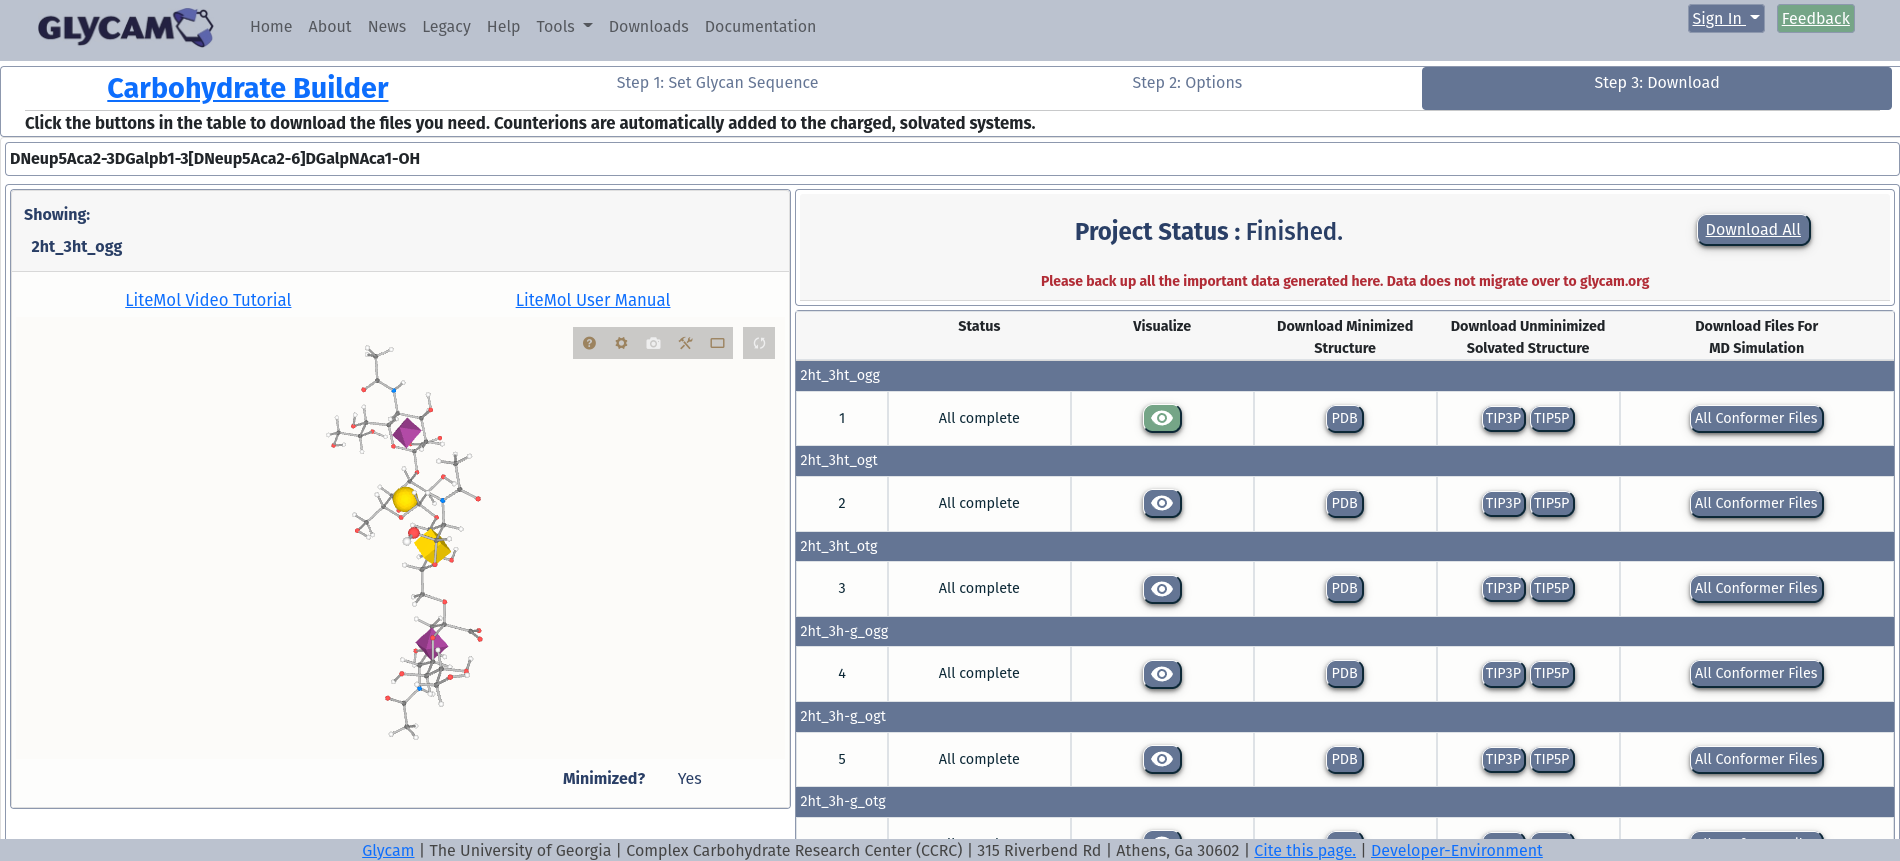
After clicking Generate Selected Structures. you will be taken to a page where you can visualize and/or download structure files for your glycan.
Step 3: Visualizing the structure
As shown in the image, once the build for any given glycan is complete, a “Visualize” button will become active. Clicking the button will open a frame in which a 3D, interactive representation of your glycan will be visible.
The OMS Downloads Page

Step 4: Downloading structure files
From the same page, you can download structure files for your glycan.
Most people will just want a PDB file for their glycan. If that is all you want, clicking the “Download” button will get you the single PDB file.
If you want any other file type, you must download all files for the glycan. If multiple structures are present, then you can choose to download all files for one or more of the structures. To learn more about the types of files in the download, please see the Annotated Output – Files available for download section.
Posted on May 22, 2017 by Lachele. Updated on May 3, 2022 by Dan Wentworth.